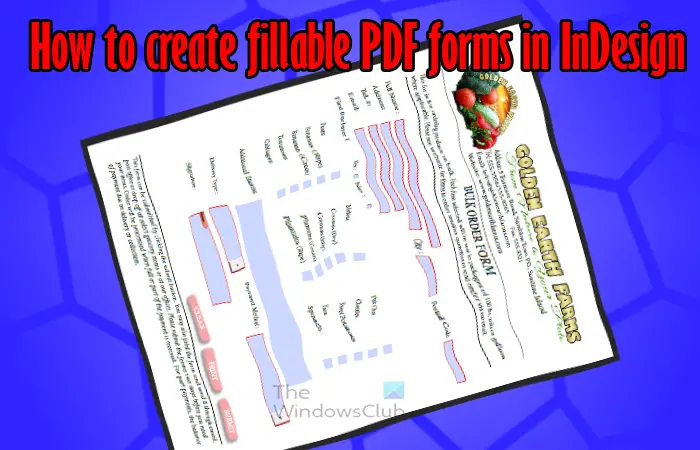
Interactive PDFs give users the ability to perform tasks in PDF files digitally. With so many things being done digitally, it Is important to learn how to create fillable PDF forms in InDesign. Fillable PDFs allow you to send forms to persons for them to fill in the information, sign and submit right from the comfort of their homes or offices using their phones, computers, tablets, etc.
Fillable PDFs can have just a simple signature line or they can be more complicated and have forms, radio buttons, combo boxes etc. You may wonder why you would want to create a form from scratch. This means of creating a fillable form allows you to add your own creativity to the form instead of using a generic form.
The first step in creating your fillable PDF form is to decide what the form is for, what information you will need, and if you want to receive the information. What the form is for will help you with the different data-taking tools that you will use. You may want text boxes to take a paragraph or just names. You may want radio buttons for either type of information. Combo boxes, etc. when you have created the form, do you want to receive the information digitally or on paper, or both? You can add a button that allows the user to print the form, email the form or they can do both.
Sketch form
You can first plan the form on paper with a pen or pencil or even use the Microsoft Words hand drawing function to make the form. The outline will make it much easier to see the form so that you can decide the combination of data instruments to use to collect the data,
Note that if you already have a form created, you can always place it in InDesign and use it as an outline for the fillable form. If you created a form in InDesign, you could always make the fields interactive and then save it as an Interactive PDF that can be filled out and printed or submitted online. In this article the full form will be created then you will be taken through the steps to make each element interactive. You can create each element and make it interactive as you go if you like.
Use graphic software to create images for form
You can use another graphic software to create elements to make your form more interesting. You can use Photoshop to create graphics to place on your form. The graphics would fit the theme of your organization or the purpose of your form.
When you have planned how you want your form to look, it is time to create it In InDesign.
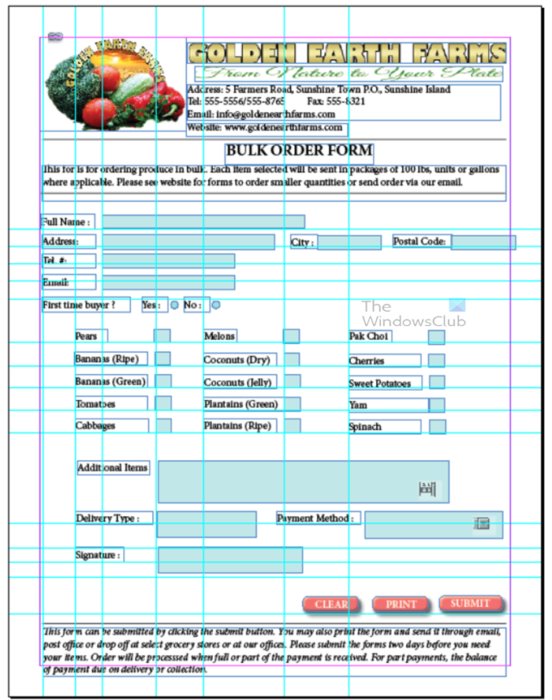
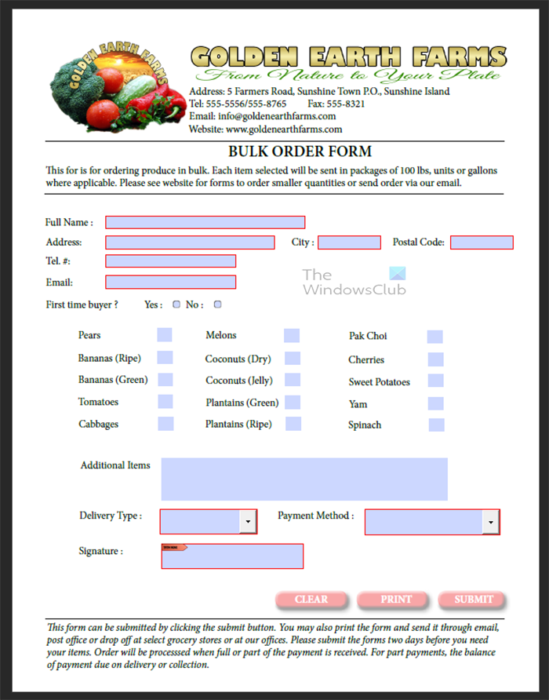
This is the form created in InDesign, you see the guides that were used to line up the elements properly.
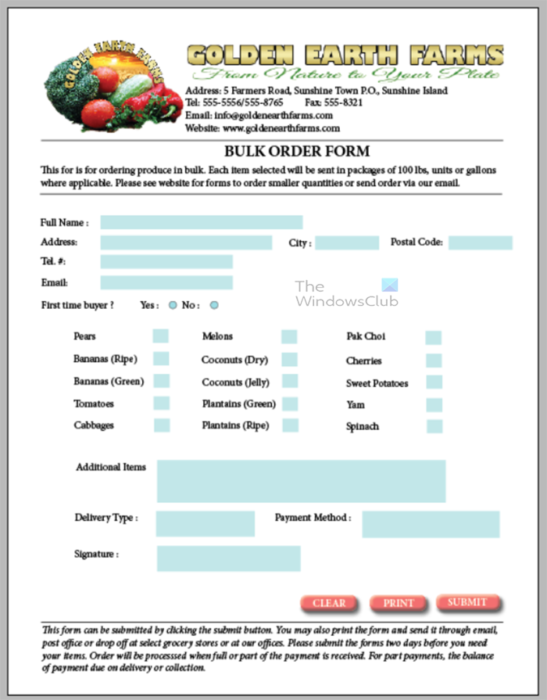
This is the form with the guides and other lines hidden. To hide the guides, press W, to make them show again just press W.
You can create the form field by field and add interactivity as you go along. You can also create the whole form with the fields and then make them add interactivity after. In this case, the whole form was created then the
The single-line text field may be the most abundant field on your form. The single-line text field is made up of a rectangular box.
This is drawn to the width and height that you want. You will indicate the content that you want in the field by placing the corresponding text beside it. The single-line text field usually has a name, telephone number, address, etc.
Add interactivity
To make this field interactive, bring up the Buttons and Forms pallet by going to Window then Interactive then Buttons and Forms. The buttons and forms pallet will open.
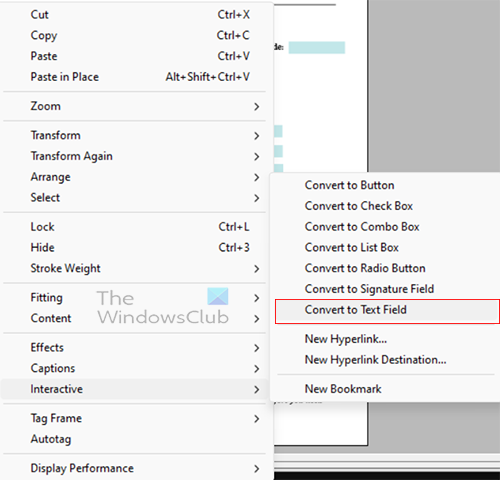
An easy way to get to the button or form that you want for your field is to right-click on the field and click Interactive then Convert to text field.
The Buttons and Forms pallet will show up here you will select the options that you want for your button.
Name
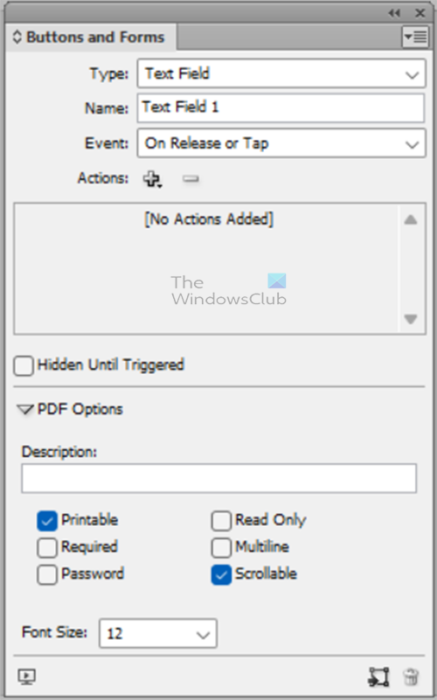
Give the text field a unique name; this is important because you will need to know it for other steps. You can name this first text field CustomerName. Do not use special characters and do not leave space between if you use two words.
Event
This is where you want the button to do something when this happens. You can leave it on the default which is On release or tap.
Actions
This is what you want this field to do, but since this is a text field it will do nothing, so this is left as it is.
Description
Write a short description of what the field is for. This is very important as whatever you put here will show up when the user hovers over the field. Ensure that you fill Description correctly so that users will know what each field is for. Do not assume that the names beside them are enough.
Other settings
Select Printable so that the data in that field will print. Select Required so that the person will have to fill out that field or the form will not submit. Uncheck Scrollable because you want all the content to hold in a single line. For this field, uncheck Password, Read-only, and Multiline, these options may be required for other fields but for the Name field, they are not required. You will know what you want for your form, so choose what you want to fit your needs. Follow these steps for each of the text fields, modifying if you need other functions. An easy way is to change one field and then copy and paste it for all similar fields; you then change the name and the other options.
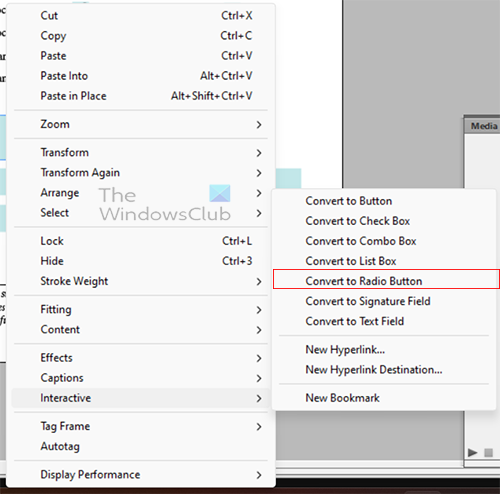
The radio buttons are the circles that get a black dot in the middle when they are selected. These work in groups of two or more and only one can be selected at a time in a group. They are usually used for closed-ended questions such as yes or no.
Create the radio button
To create the radio buttons, write the questions the put Yes and No. You would then put a small circle after Yes and one after No. When they are created, hold Shift and select both circles.

You then right-click on both circles, select Interactive then Convert to Radio Buttons.
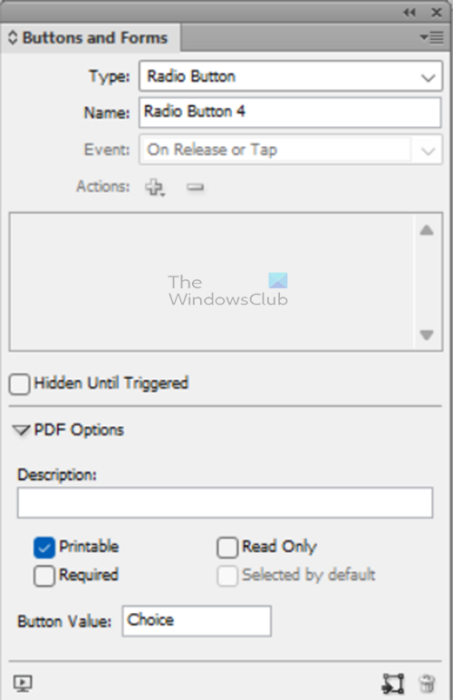
The buttons and Forms panel will appear. Give the radio buttons a descriptive name. Remember that if you have more sets of radio buttons in your form, you will need to identify them. Each set of radio buttons should have the same name so that they will be grouped. Since these radio buttons are for the question first-time buyer, you can name both FirstTimeBuyer. Since you selected both, they should automatically get the same name. You can then select each separately and give animation, such as what you want them to look like when the user rolls the mouse over the radio buttons.
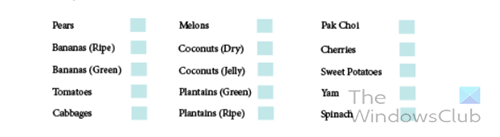
The checkboxes work almost like the radio buttons. However, check boxes allow the user to have more than one option selected. To create the checkboxes, write the words that you want then draw a little square beside it.
Add interactivity to checkboxes
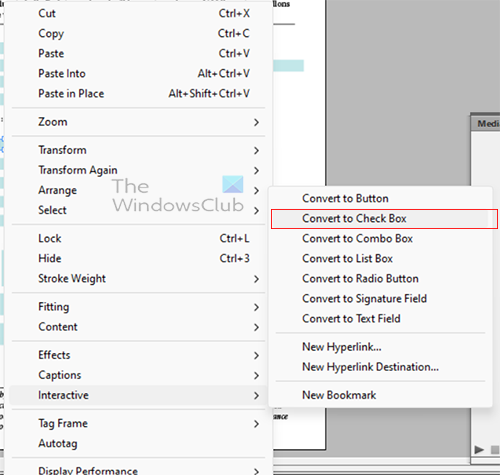
With the checkboxes created, it is time to make them interactive, right click on the box, and from the menu select Interactive then Convert to check box.
The Buttons and Forms pallet will appear. Give the checkboxes descriptive names, these will be named based on the items beside each.
With the Buttons and Forms panel open you will just need to click on each, change the name and move to the next. You will not need to add any Actions.
This is where you can add a List box. The list box allows the user to select multiple items from a list of items. The user will not be able to edit the items, however, they can select multiple items from the list.

The list box is rarely used in forms, the Combo box is normally used instead. However, you can use it if you so choose.
To create the List box, write the words that you want to use to label the List box, you then use the rectangle tool to create a rectangle. When the rectangle is created, right-click on it, and from the menu select Interactive then Convert to list box.
The Buttons and Forms palette will appear, give the List box a descriptive name. Make sure Printable and Multiple Selection are selected. You can make it required depending on the information that you need for your form. You can also select Sort Items if you want the items in your list to be sorted alphabetically. You may not want to sort if you want to place an instruction as the first item in the list box. Go to List Items and enter the items that you want in the list. Click the Plus (+) after each. If you want to arrange them in a specific order in the last, you can click and drag the items into position.
This is where you can add the Combo box that will allow the user to select a single item from the list you create.
To create the combo box, write the descriptive text then create a rectangle. Select the rectangle then go to the top menu and select Window then Interactive then Buttons and Forms. The buttons and forms pallet will appear. in the Type field select Combo Box. Give the Combo box a descriptive name. If you will use multiple Combo boxes, they should each have different names. You would then make sure that Printable is selected if you want the user to be able to print that content. Depending on the requirements of your form, you will need to select Required.
This clear form button is used to clear the content of the form. You can create a regular button using a shape or use a word such as clear and make it into a button using the Buttons and Forms pallet. In this case, a button was created using a rectangle then the edges were rounded and the word Clear added.
To make the button interactive, right-click on the button then go to Interactive then Convert to button.
The Buttons and Forms pallet will appear, you should give the button a unique name, such as Clear. You will need to add an Action, so click the Plus (+) and choose Clear Form. You can also make the button animate with different levels of brightness when it is Normal, rolled over, and then Clicked.
You can follow these steps for the Print and the Submit buttons on the form. However, there are a few differences. For the Print button, you will choose the Action as Print form. For the submit button you will choose Submit form as the Action, you will then enter the email address in the URL value box. You will write the URL as mailto:[email protected].
If you want your form to be authentic, you can add a signature field. Simply add text then place a rectangle beside it. You will then right-click on the rectangle and from the menu select Interactive then convert to Signature field.
The Buttons and Forms pallet will appear, and the option will be the Signature field; give it a descriptive name in the Name field. There will be no action. Select Printable if you want the signature to be printable by the user. You can also select Required so that the form is not submittable without the signature.
Setting the tab order is very important in forms. The Tab order is the order that the cursor will jump whenever the user presses the tab key in the form. Users usually press the tab key to move on to the next item in a form as they fill out the form. If the Tab order is not correct, it could lead to wrong results and frustration for users. If you created the form straight in order from top to bottom, then the tab order is usually straight as it should be. InDesign naturally follows the flow of how you created the form. However, for some reason, your Tab order may be thrown off.
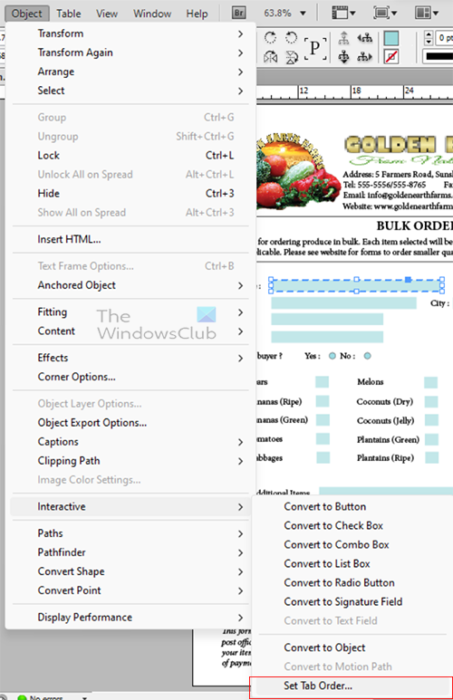
Here is how you can check and correct your tab order. Go to the top menu bar and press Object then Interactive and then Set Tab Order.

The Tab Order window will show up and you will see the names of the form fields in the order that they will appear as the user presses the tab key. you will now realize the importance of the unique names of the different fields. Check through the list to see if they are all in order. You can also export the form as an Interactive PDF and press the Tab key and see if things are in order.
If you have items that are not in order in the Tab Order window you can just click it and press Move up or Move down. If you want to move multiple items at once, hold Ctrl then select each item. When they are all selected press Move up or Move down and they will all move together.
Now that the form is finished, the next step is to save it as an Interactive PDF.
 Save form as PDF 1" width="" height="" />
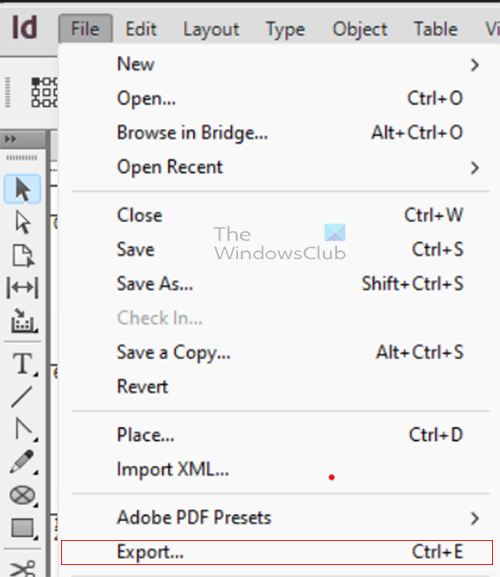
To save the form as an Interactive PDF go to File then Export or press Ctrl + E.
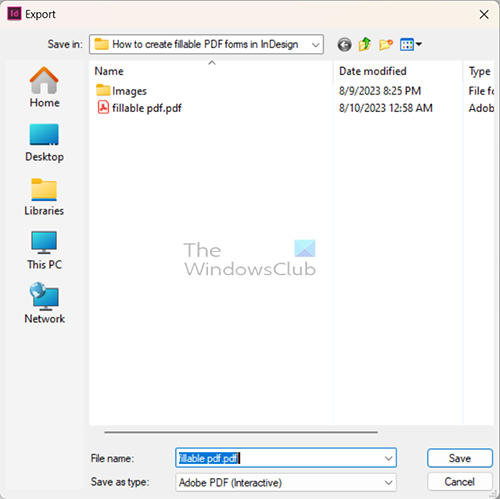
The Export window will appear, give your file a name and then choose Save as type Adobe PDF (Interactive) then click Save.
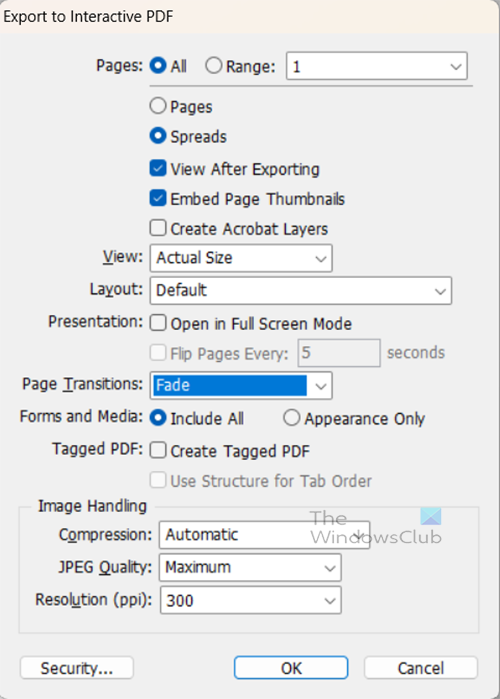
The Export to Interactive PDF options window will appear, here you will choose additional options for your interactive PDF. You can make the View Actual Size and the Resolution higher like 300. When you are finished press Ok to keep the options and close the window.
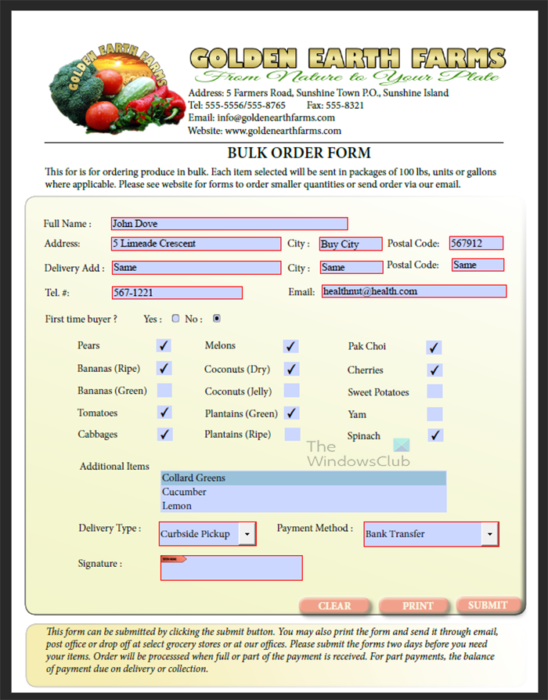
This is the Interactive PDF that you exported. You will notice some form fields with a red border; those are the required fields.
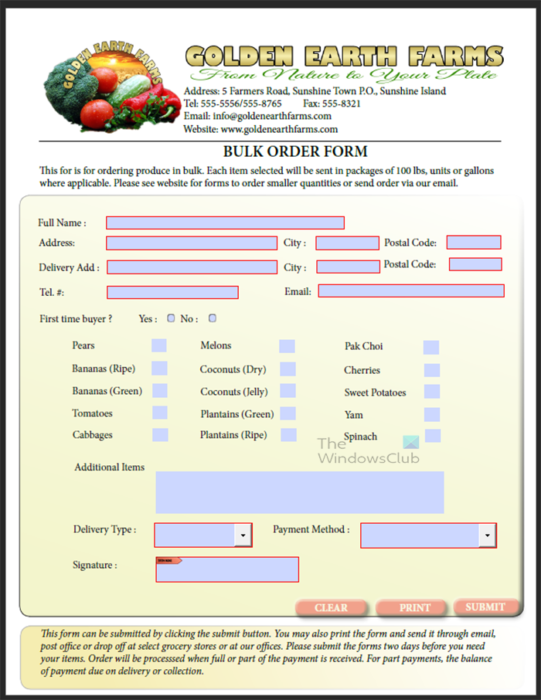
This is the step that will add or remove fields and make the form more attractive. When you save as an Interactive PDF and view the form, you may see where you need to add more fields to get more information. You may also notice that your form needs more things to make it more attractive. You can do these things and then save and re-export as an Interactive PDF. On this form, I realized that the customer’s address may be different from their delivery address, so it was added to the form. Some color was added to some areas using a rectangle and color added and the rectangle was placed at the back.
Add hyperlink
You can choose to make the website at the top of the form clickable by hyperlinking it. You would write the website as a separate text. You right-click the text or image to be hyperlinked, select Interactive, and then New Hyperlink. The New Hyperlink window will appear. Enter the web address that you want the link to go to.
Updated fillable PDF form.
Filling out the Interactive PDF
The user can easily fill out the Interactive PDF form and submit or print it. The form will also allow the user to save the form that is filled out and save, edit, or submit it later.
Making a fillable PDF in InDesign is quite easy, you would create the form as you would normally do. You can then select each field, right-click, and make it into a text field, button, list box, or any of the available form fields available. You would then save the form as an Interactive PDF. You can then send it to users or upload it to your website. Users will be able to fill and submit or print or both.
Fillable forms are quite easy to send to anyone. They are just like regular documents except that they are fillable and can be submitted online. You can send them through regular email attachments. You can send them via social media. You can send them using a cloud service such as OneDrive or any other. You can choose to add them to your website so that users can download and fill them out and submit them.
Published on August 18, 2023 Tags: InDesign


Yulando is a graduate of Computers & Information Technology and has worked for many years creating, maintaining, and repairing computers and networks, and in Web site designing. He has also managed a printery and done graphics designing. He is trained in Advanced Microsoft Word, Access, and Excel.